Treasured by Holly

Crochet Shamrock Pattern

Holly PitcherComment

If you're in search of a little bit of luck this St. Paddy's Day, then these cute little Shamrock's are just what you need. Make a garland for your mantel or sweet little hair clips for your littles. Either way, they will become a fun addition for your home and family.


Crochet Shamrock Pattern
Materials needed:
F Hook
Worsted Weight Yarn (I prefer Drops Paris #11 Green)

Abbreviation list:
CH - Chain
SC - Single Crochet
TR - Treble Crochet
Sl st - Slip Stitch
Shamrock Pattern
Create a Magic Ring (video tutorial here).  The shamrock’s petals will be worked into this ring.
Petal 1: * CH 4, Work 3 TR into center ring.  CH 3, SC into ring.* 
*Repeat 2 more times for a total of 3 petals.
Stem: After working petals, CH 5.  Work 1 SC in 2nd CH from hook, 3 Sl st in chains just made, working back towards the petals.  Join with a Sl st into center ring.
Fasten off and weave in ends.

Garland:
CH 50, *SC into top of CH 4 on first petal, CH 20* repeat until last Shamrock is added. Then CH 50.
I made 10 Shamrocks for my Garland, but you can make it as long or as short as you would like. 


Valentine Heart Garland

Holly PitcherComment

Are you needing a fun and unique addition to your Valentines décor. Give your home a little love with this super cute and easy to make Crocheted Heart Garland.


Materials needed:
G Hook
Worsted Weight Yarn (I prefer Drops Paris in Red #12)

Abbreviation list:
CH - Chain
SC - Single Crochet
TR - Treble Crochet
Sl st - Slip Stitch

Round 1: Create a Magic Ring (video tutorial here) and CH 3, 7 TR, CH 1, 7 TR, CH 3 and then Sl st inside the Magic Ring.

Round 2: CH 4, 2 SC in the next 7 TR, CH 2, 2 SC in the next 7 TR, CH 4 and Sl st inside the Magic Ring. Close ring, fasten off and tie in ends.

Repeat 9 more times for a total of 10 hearts.

Garland:
Chain 50
Attach hearts by SC into top of CH 4 on one side of the heart, CH 5, SC to top of CH 4 on other side, CH 15. Repeat for each heart until you reach final heart. After last SC, CH 50 and fasten off.


Hope you enjoy making this cute little garland!! Happy Crocheting!


Mini Crochet Bow Pattern - Free

Holly PitcherComment

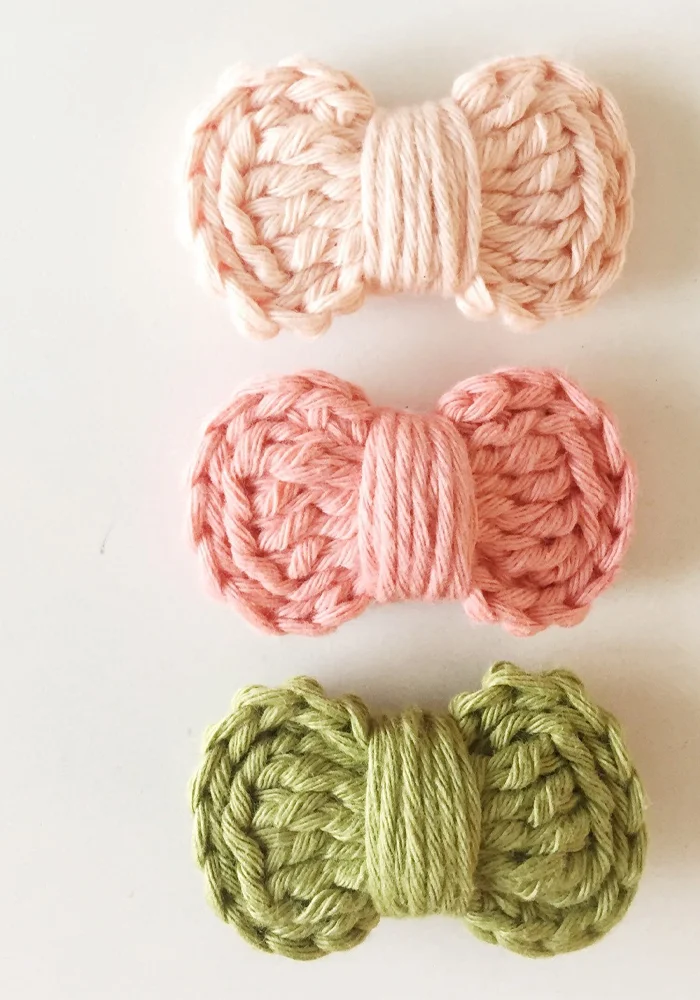
One of my most favorite patterns that I have created to date are these fun Crochet Bows. They are my go to for Baby shower gifts as they are quick and easy to make. Perfect on a headband or hair clip these little bows are sure to delight!

Mini Puff Bow or Single Bow

SKILL LEVEL: 

Beginner/Intermediate

CROCHET HOOK:

Size F

YARN SIZE:

3 or 4 (DK-Worsted weight)

SIZE:

One Size fits all

FINISHED SIZE:

2 1/2 in.

First Bow –

Rnd 1:

Ch 5. Tr into 1st Ch 4 times , Ch 4, slip stitch into 1st ch.

Rnd 2:

Ch 4. Tr into 1st Ch 4 timess , Ch 4, slip stitch into 1st ch.

Tie off weave in ends. (If making single bow leave one tail and skip to Finishing)

Second Bow –

Rnd 1:

Ch 5. Tr into 1st Ch 4 times , Ch 4, slip stitch into 1st ch.

Rnd 2:

Ch 4. Tr into 1st Ch 4 times , Ch 4, slip stitch into 1st ch.

Rnd 3:

Without tying off, weave in beginning tail and place hook back into last slip stitch made. Ch 1. Place bows back to back and Sc through the two top loops that are touching (back loop of front bow and front loop of back bow) all the way around, stitching the two bows together (24 total Sc around bow).

Rnd 4:

Slip stich into first Sc. Measure out an 18” tail and cut yarn.

FINISHING

Take tail and wrap around center of bow. Weave in ends. Now you can hot glue an alligator clip (single or double prong whichever you prefer), elastic or metal headband to the back of the bow. Allow to dry and it’s ready to use.

crochet mini bows

Have fun crocheting!!!

Breathe and have Courage to Simplify

Holly PitcherComment
Going into my third year of choosing my One Little Word with Ali Edwards it always amazes me how my word always finds me. This year it wasn't any different. Though I did fight this word at first, I knew in the end it was meant to be. My word for 2015 is:


As I've taken my previous words into my life I have learned to Breathe and just slow down and enjoy each moment, to have the Courage that its okay to say no and to be myself and now with Simplify I want to work smarter not harder. By definition, to make things less complex. I love how each of these words are building on each other to help me become a better mother, wife and friend.


My goal in 2015 is to bring my life down to its simplest level of wife, mother, friend and business owner. I'm not going to compare what I'm doing wrong, or even right, to those that surround me. It is to easy to get caught up in the politics of life. "She" has what I want or why can't I be more like "her". The best is what is "she" doing right that I'm doing wrong. Who is this "she" that makes me feel so inadequate? It could be business's that I follow, people that I admire or friends that surround me. I don't want that to be my driving force. This year I want to let that go (feel free to break out in song now, lol) and focus on simplifying my life and how I can make it better for me and my family.

Here in this first week of January I don't know what this means for me, but I am so excited for this journey. 2015 lets do this!!!

Hand Exercises for Crochet and Knitting

Holly Pitcher1 Comment

Crocheting, or Knitting for that matter, can wreak havoc on your fingers and wrists especially if you’re doing it for long hours at a time. On average  I usually spend about 4-5 hours a day crocheting. Though, during the fall/winter months that will double. Before I begin I exercise my fingers and wrists to help with pain and stiffness that can occur. I also take a break about every 45 minutes to perform these exercises again. It totally helps me and I hope it will help you as well!


Exercises for the Fingers

  • Place your Left pinkie finger in your right palm and press pinkie back repeat for all fingers then switch to your Right pinkie and repeat for each finger. Next take your thumb and press fingers into your palm and repeat for each hand.
  • Hold your hands in front of you and curl your fingers so they touch the bottom of your palm. Slowly uncurl them until they are once again straight. Repeat at least 5 times.
  • Spread your fingers as far apart as you can. Next bring them together forming a fist and squeeze. Repeat at least 5 times.
  • Use the thumb and forefinger of one hand to massage the web of the thumb on the other.
  • Twirl your thumbs in a circular motion.

Exercises for the Wrists

  • Hold your hands arms out to sides of your body and make a fist. Draw circles with your wrists while pressing your arms backwards.
  • Place your palms together (think yoga-prayer position) and push. Angle your wrists downwards with your elbows slightly up. Hold for a minute or so.
  • Lay the back of your hand on a flat surface, and press down lightly with your arm. Hold for a minute or so and repeat for other hand.
  • Bring your right hand up palm forward and place your left thumb on your wrist with your fingers placed on the back of your wrist. Using your thumb and fingers massage the bones and tendons that are in your wrist. Repeat for other wrist.

*Don’t forget to stretch your neck and your back as well. Every little bit helps!